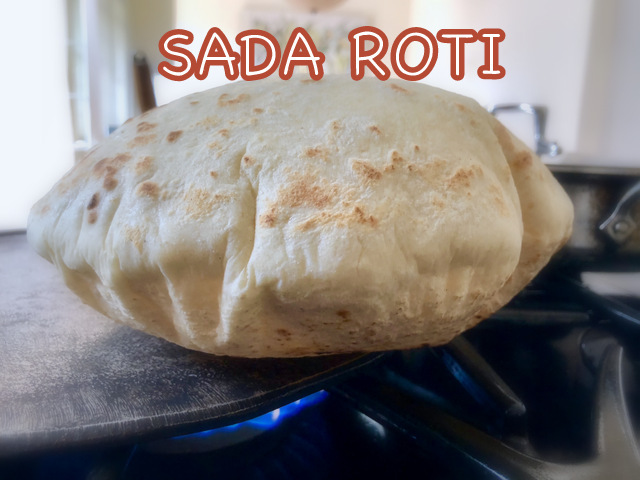
Sada roti is one of the main staples in Trinidad. It is a leavened flatbread eaten for breakfast or dinner with a variety of vegetarian, fish, or meat dishes — including curries or stews. It is to Trinidad what flour tortilla, naan, pita bread, and chapati are to the rest of the world!
Table of Contents
Watch my latest video here(October 2024)
WHO CREATED SADA ROTI?
The technique was brought to Trinidad by the Indentured servants, some of whom are our great-grandparents, who came to work in the sugar cane fields in the 1830s after the end of slavery.
MY ROTI STORY
My cooking journey started with the making of sada roti. For me, it was one of the most challenging things to do. Some of the problems I encountered were stiff dough, misshapen, never ‘swell’, and hard like a rock. Nothing impressive. I’ve asked questions and studied the process from professional homemakers and seasoned roti cooks, and I have practiced and practiced for over three and a half decades.
I aimed to make a soft roti that swells and teach my husband to do it. Once I accomplished that, I knew I was capable of teaching. No roti story is complete without telling you about the first time I made roti. I was 9 and mummy had gone to the hospital to ‘make a baby’! I went to the kitchen to create dinner for my daddy. While I was kneading the flour, I looked out the window to see Aunty Mala, the neighbor and mummy’s best friend, had summoned her kids to watch me ‘cook’ through the round brick tiles in their kitchen. They were quite surprised I was doing it at such a young age!
That was my first cooking show and I beamed silently with pride. That night, I made daddy tomatoes and salt fish with the roti–no supervision, no casualties, no poisoning, and no choking reported. Success.
WHAT ARE THE INGREDIENTS IN SADA ROTI
Sada roti is made with basic ingredients, including all-purpose flour, salt, baking powder, and lukewarm water. Many people don’t use salt, but I find it rather tasteless without the salt. Sada Roti is vegan and vegetarian!
WHY IS MY ROTI STIFF AND HARD? WHY IS MY ROTI NOT SOFT?
If you have made roti in the past that was stiff and hard enough to hurt someone, have no fear. By using the kneading technique I teach you in my video and by adding just the right amount of water, you can make a soft dough which will result in a soft and edible roti. Practice makes perfect. It is also important to wrap properly after cooking.
WHY MY ROTI DID NOT PUFF OR SWELL?
Over the generations, many Indian women have suffered shame and disgrace as a result of husbands and mothers-in-law who disapproved of their roti.
There is a saying that an Indian woman is not ready for marriage until she can make her roti swell. If that had been the case, many of us Indian women would still be single, which, coming to think of it, isn’t a bad thing (Shhh, don’t tell my hubby).
Several years ago, I developed the winning recipe and technique with exact measurements. I want you to know that you may not achieve the joy of a swollen roti in your first 100 attempts (even though many have after watching my YouTube video! ), but rest assured, you will still have roti. I advise you to aim for a soft roti, one you can chew. The swelling of the roti is just a bonus, a goal to work towards!
Some reasons why your roti did not swell are:
- You rolled out the dough too thick or too thin
- It needs to be rolled out evenly
- Your dough was too stiff, which means more water was required to make a soft dough
- Your tawa wasn’t hot enough.
- You cooked it too long on the first side.
- You did not knead it adequately.
- You kneaded a hard, stiff, dough
- Your baking powder may be expired or ineffective.
- You did not seal it properly when making the dough ball (loyah)
WHY IS MY DOUGH SPRINGING BACK AND DIFFICULT TO ROLL OUT?
Your dough(loyah) is not ready and needs to rest longer- min 15 mins and up to 30 mins or longer. When pressed it should leave an indent – that’s when you know it is ready.
WHY IS MY ROTI NOT ROUND?
When making the loyah (dough ball), ensure it is perfectly round. The roundness starts at this point. The next step would be to flour your counter, place the dough on the counter, and press into a round disc. After that, it needs to be rolled out evenly in long strokes. When it becomes elongated, turn 45 degrees and roll again. Continue rolling and turning until you achieve a round shape. If it’s still not round, you can stretch it into shape for a few seconds once it is on the tawa.
HOW TO MAKE GLUTEN-FREE SADA ROTI?
If you love sada roti but need a gluten-free version, here’s a simple tweak: replace the all-purpose flour with your favorite gluten-free flour blend! To help the dough hold together and get a softer texture, try adding ½ teaspoon of guar gum or xanthan gum per ½ cup of gluten-free flour.
These additions work wonders in gluten-free baking, and here’s why:
- Acts as a Binder: Both guar gum and xanthan gum help bind ingredients together, making the dough easier to roll and shape.
- Adds Elasticity and Flexibility: They mimic the stretchiness of gluten, making it possible to roll out the dough without tearing.
- Enhances Texture: Guar and xanthan gums improve the overall texture, giving your roti a soft, slightly chewy feel.
- Helps Retain Moisture: These gums trap moisture, keeping the roti from drying out and helping it stay soft for longer.
Simply add these gums to your gluten-free flour and keep the rest of the ingredients the same. Enjoy your soft, delicious gluten-free sada roti with all your favorite fillings or sides!
HOW TO STORE SADA ROTI
Firstly, you can save the dough in a tightly sealed container in the fridge up to 3 days. Bring to room temperature and cook when ready.
Freezer: I have also successfully stored the dough in a resealable bag in the freezer for a couple of months. Cooked roti should be wrapped in a paper towel, then a kitchen towel, and placed in a container that seals tightly. Well-wrapped roti (paper towel, then foil, then resealable bag) can stay in the freezer for up to a month. Thaw overnight in the refrigerator and reheat before using.
For roti on the go(school lunch or other lunch), our moms wrapped the roti (stuffed with patchoi or butter and cheese, etc) first in a paper towel, then aluminum foil, which kept it soft for a few hours. Roti left exposed to air will certainly become stiff after a while.
HOW TO REHEAT ROTI
Wrap the roti in a paper towel and microwave for a couple of seconds; the time can vary from one microwave to the next – so know your microwave. If microwaved too long, it can stiffen and become too chewy and hard.

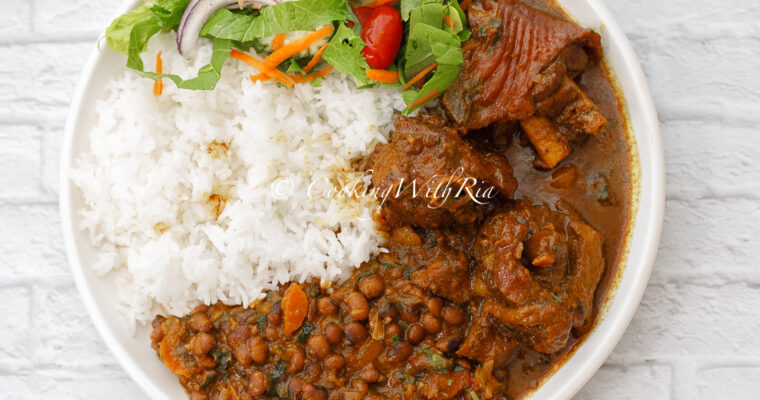
WHAT TO EAT WITH SADA ROTI (or generally any type of roti):
Sada roti is eaten in Trinidad with a variety of veggie and non veggie dishes, including curries, stews, dhal and various beans.
Here are a few popular recommendations:
Vegan / Vegetarian Options / Traditional Plant-Based:
Baigan choka, Tomato choka, Pumpkin talkarie, fry bodi, fry bodi and aloo, fry aloo, fried ochro, curry channa and aloo, 25 min curry canned channa, curry chaitaigne, bhaji(using frozen spinach), bhaji(using chorai bhaji), curry seim, fry seim and aloo, curry aloo, mango talkarie, bhagee, sada aloo, aloo choka, sada eddoes, patchoi,cabbage and tomatoes, curry cabbage, zaboka choka,dhal, curry baigan and aloo, curry baigan and aloo with channa,
Seafood Options:
Simple curry Fish, buljol, curry fish (fried method), curry seafood medley, sardine choka, canned sardine with tomatoes, fried fish, fry sardine, canned sardine with tomatoes, canned salmon with tomatoes, curry canned salmon, curry shrimp.
Meat Options:
Curry chicken(click for 7 curry chicken recipes), stew chicken, stewed chicken with potatoes. curry goat, curry goat with potatoes, curry beef, stew lamb, canned corn beef with tomatoes, geera chicken, geera pork
Now let’s make roti!
Ingredients You Will Need to Make Sada Roti:
- all-purpose flour, more for kneading and rolling
- baking powder, preferably aluminum-free
- salt, optional
- lukewarm water
Step by Step Instructions on How to Make Sada Roti:

3. Divide the dough into four equal pieces. Shape each piece into a ball by rolling each between the palm of your hands, applying gentle pressure until the balls are smooth and without cracks–squeeze it at the top to seal properly. Cover the dough balls loosely with a cloth and let rest for a minimum of 5-10 minutes.

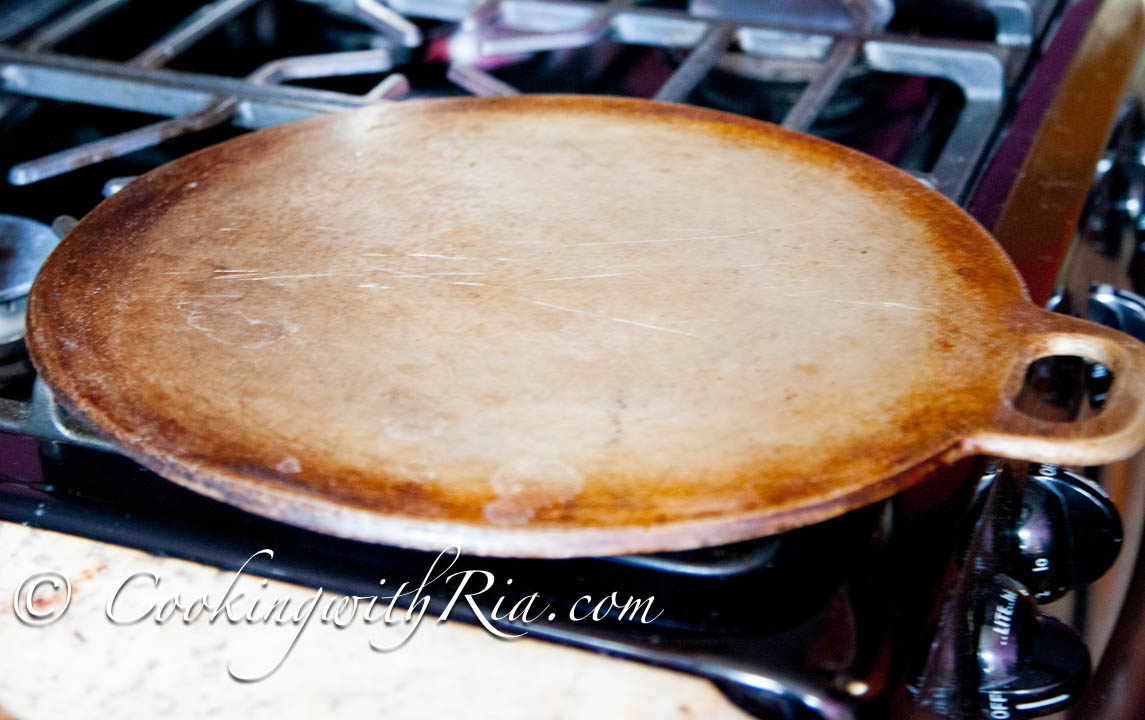
4. When you are ready to cook the roti (hopefully the dough is ready as well), heat the tawa, dry cast-iron skillet, or griddle over medium heat until hot.
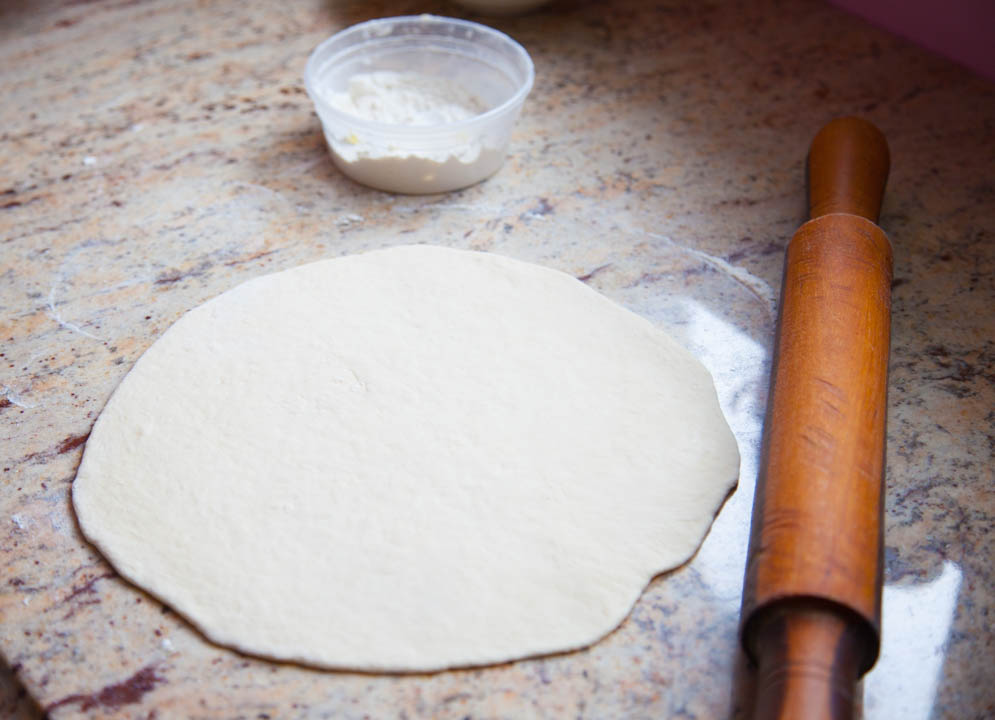
5. Working with one ball of dough at a time (keep the remaining dough covered) and using just enough flour to prevent sticking to counter and rolling pin, press the dough into a small flat circle(about 4 inches). Using the rolling pin, roll the dough. Flip, rotate and roll until it becomes an even 9 inch round, ¼ inch thick, making sure that the edges are not thick. If you can’t make it round, don’t panic, it tastes just as good.
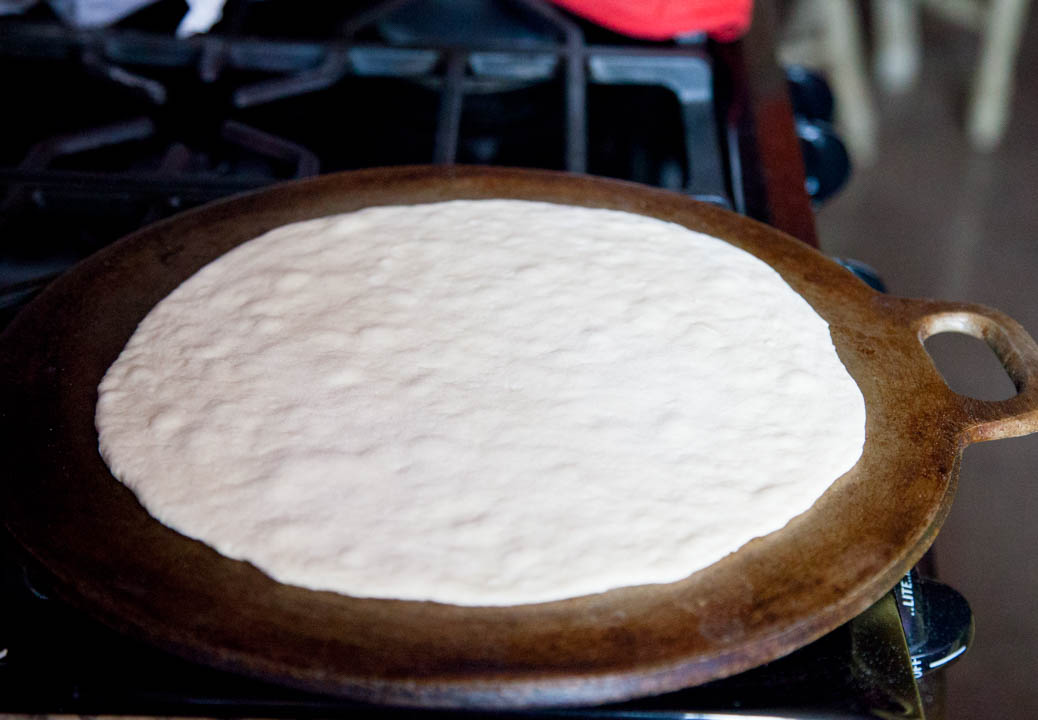
6. Pick up the dough, place it on the palm of your hand, and lay it on the tawa by quickly flipping your hand over the tawa. Cook until small bubbles appear on the roti, about 15–20 seconds. Turn immediately using your fingers or a spatula and cook until the bottom is lightly browned in spots, about 45 seconds more.

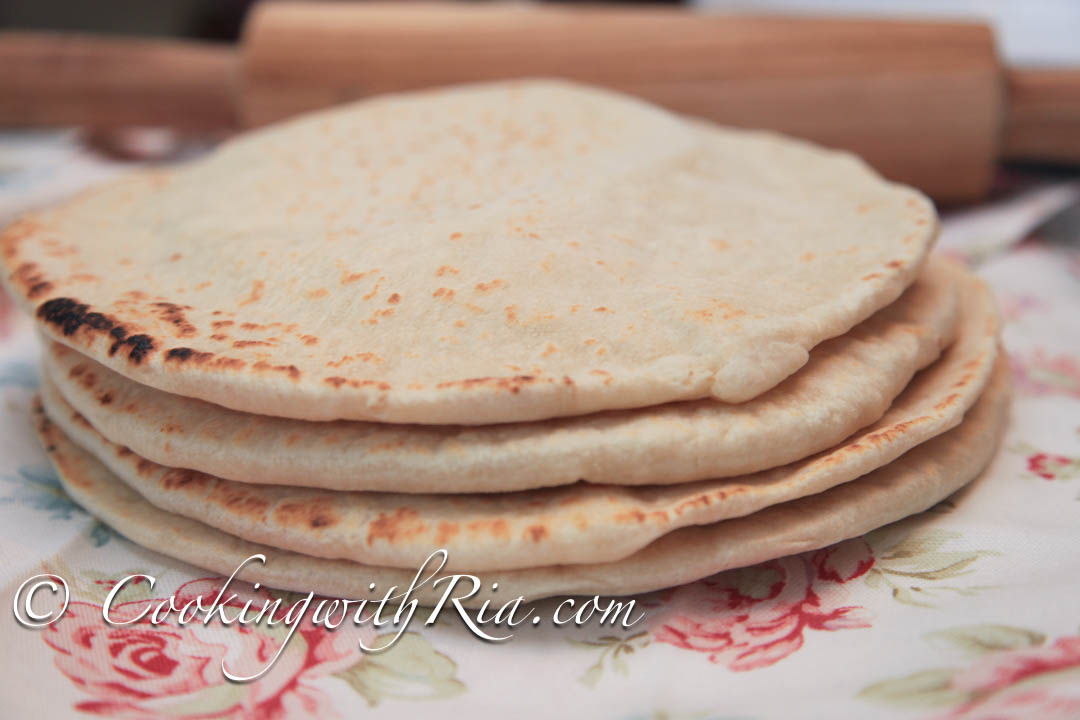
8. Repeat rolling out and cooking the remaining dough, stacking, and wrapping the finished roti in a clean kitchen cloth or towel. Once they’re all cooked, let them rest covered for 10 to 15 minutes before serving. During this time, they’ll steam themselves, becoming soft and pliable. You can also wrap the cloth-wrapped stack in foil and keep warm in a 200°F oven for about an hour. We usually cut the roti into quarters before serving.
SADA ROTI RECIPE
Equipment
- Tawa
Ingredients
- 4 cups all purpose flour unbleached, more for kneading and rolling
- 4 teaspoons baking powder aluminum free
- 1 teaspoon Himalayan salt optional
- 1 1/2 cups lukewarm water
Instructions
- In a medium bowl, combine the flour, baking powder and salt.
- Make a well in the flour and add water gradually until the dough looks shaggy. Mix and knead with your hands until the dough is smooth, medium soft and not sticky, 3 to 4 mins. Watch my detailed YouTube Video on how to accomplish this. Cover and set aside at room temperature for at least 15-30 minutes.
- Divide the dough into four equal pieces. Shape each piece into a ball by rolling each between the palm of your hands, applying gentle pressure until the balls are smooth and without cracks--squeeze it at the top to seal properly. Cover the dough balls loosely with a cloth and let rest for a minimum of 5-10 minutes.
- When you are ready to cook the roti(hopefully the dough is ready as well), heat the tawa, dry cast-iron skillet or griddle over medium heat until hot.
- Working with one ball of dough at a time (keep the remaining dough covered) and using just enough flour to prevent sticking to counter and rolling pin, press the dough into a small flat circle(about 4 inches). Using the rolling pin, roll the dough. Flip, rotate and roll until it becomes an even 9 inch round, ¼ inch thick, making sure that the edges are not thick. If you can’t make it round, don’t panic, it tastes just as good.
- Pick up the dough, place it on the palm of your hand and lay it on the tawa by quickly flipping your hand over the tawa. Cook until small bubbles appear on the roti, about 30 seconds. Turn immediately using your fingers or a spatula and cook until the bottom is lightly browned in spots, about 45-60 seconds more.
- Flip again and cook until the roti puffs entirely or in spots and browns lightly on that side, 45-60 seconds more (if it doesn’t puff, the tawa isn’t hot enough, the dough is too dry, or you cooked it too long on the first side).
- Alternatively, using a cloth move tawa to expose open flame and toast edges of roti; rotating roti over the flame every two seconds, until the entire roti puffs up(roti should not touch flame but sit about an inch or two above it). You may need to flip roti and toast the other side also to “make the roti swell”—puff up…It does not puff up every time, but it is just as good.
- Remove the roti from the tawa, dust off excess flour and wrap the roti immediately in a clean, dry cloth or kitchen towel.
- Repeat rolling out and cooking the remaining dough, stacking and wrapping the finished roti in a clean kitchen cloth/towel. Once they're all cooked, let them rest covered for 10 to 15 minutes before serving. During this time, they'll steam themselves, becoming soft and pliable. You can also wrap the cloth-wrapped stack in foil and keep warm in a 200°F oven for about an hour.
Video
Notes
• Use good baking powder; old or expired baking powder will result in raw roti.
• Is the dough moist or dry after kneading? It should be moist but not too soft.
• Ensure that the dough is rolled out—not too thick or thin—if too thin, it will be stiff and if too thick, it will not cook properly.
• If the dough is springing back when rolling out, leave it to rest longer.
• The raw dough can be kept in the fridge for a day or two until you are ready to make the roti.
• Well-wrapped roti keep in the freezer for up to a month. Thaw overnight in the refrigerator and reheat before using. Nutrition was calculated per 1/4 roti.
Nutrition
Enjoy with:
SAUTEED PAK CHOI RECIPE
CURRIED CHANNA AND ALOO RECIPE
FRY BODI RECIPE (TECHNICALLY SAUTEED NOT FRIED)
TOMATOES CHOKA RECIPE
BAIGAN CHOKA (EGGPLANT CHOKA) CLICK HERE FOR RECIPE
PUMPKIN TALKARIE (SAUTEED PUMPKIN) RECIPE CLICK HERE
TRINIDAD STEWED CHICKEN RECIPE
CURRIED GOAT CLICK HERE FOR RECIPE
DHAL (SPLIT PEA SOUP) CLICK HERE FOR RECIPE


My Roti swells, has a good taste, consistency, texture. Yet it is raw inside. This happens almost every time. Is it the flour I am using? (All purpose) or … ??
All your recipes are always 10/10.
Thank you so much!